")
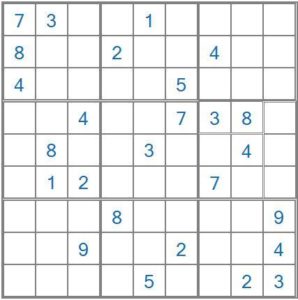
This puzzle has a few less numbers to start with than our previous puzzle did, but overall it doesn’t look much more challenging, does it?
Well the difficulty comes from not just the amount of starting numbers, but more importantly, their placement.
Before we start chipping away at this puzzle though, let’s take a peek at what it would look like with the Candidates filled in. Candidates are also known as Small Numbers. If you’re playing Sudoku online or otherwise using a Sudoku program, the program should have a feature to fill in the candidates for you. They can of course also be filled in manually, and this is a good idea when certain cells are down to 2 or 3 remaining candidates.

As you can see, having the candidates filled in gives you a quick overview of which cells are prime targets to try and attack, and also the relationship between different cells. These relationships will help us spot hidden and naked pairs and triples, which we’ll work on below. When using candidates manually, always remember to strike out all applicable candidates when filling in a big number, otherwise you’re bound to confuse yourself later on when going through the puzzle.
So a quick glance at the candidates shows us that there are no naked singles in the puzzle, since there are no cells with just one candidate. There are however some hidden singles. Before we fill those in, let’s discuss a couple techniques for actually finding those hidden singles. The first is Squeezing. This is the simplest way to sniff out hidden singles. With this technique, we’re going to break the board down into separate boxes of 3 rows or 3 columns, and look for instances of 2 numbers within those columns or rows.
So let’s start with the top 3 rows, where we have one instance of dual numbers, a pair of 4’s. We now know that a 4 must go in the top row of box 2. Now we can look down the columns for more 4’s to see if we can fill in a big number. In this case we can’t yet do so since no other 4’s are present, but we could fill in the 4’s in each of those cells as candidates if we were tracking candidates manually, so we could easily remember that one of those top 2 cells in box 2 contains a 4.
Down to the middle section of rows we go, and we have a bonanza of possibilities here, as there are a pair of 8’s, 4’s, 3’s and 7’s. Let’s start with the 3’s, which give us our first taste of the power of squeezing. We can see the only remaining row in box 4 our 3 could go in has but one cell left in it, making the 3 our big number for that box. There’s one hidden single down. We’re similarly lucky with the 4’s, which also leave us with just one possible cell in R5C3, thanks to that 4 in column 1.
We’re not as lucky with the 4’s, which have an entire empty row in box 5, and no other 4’s in the connected columns. Lastly are the 8’s, which will also take up residence in that bottom row of box 5. With an 8 already in column 4, we know that 8 will have to be in R6C5 or R6C6. Remember also to go back and look for new squeezing possibilities after you’ve filled in new big numbers.
After doing all the squeezing we can in the remaining 4 sections, and then going back and giving the board another look, our board now looks like this.
Cross Hatching
Before we move on, there’s a hidden single in box 7 that is slightly more difficult to find than simply using squeezing, it’s requires a combination of squeezing and then the next technique I’ll explain, Cross Hatching. Look at the 2’s along the bottom boxes, which leave us knowing that a 2 is either in cell R7C1 or R7C2.
Instead of just marking them as candidates and moving on, a little extra detective work can uncover which of those cells it belongs to. Look up those two columns now. You’ll see that a 2 is already in box 4, and when we get up to box 1, we see that column 1 is already filled with numbers. That means the 2 can only go in R7C1, since it will have to go in column 2 of box 1. And since we’re analyzing it, we can see that the 2 goes in R3C2 of box 1, thanks to the existing 2 in row 2.
So now we’ll look at the other technique for finding hidden singles, which we just partially demonstrated, called Cross Hatching. What we’re going to do with cross hatching is target a row or column that is nearly complete and systematically go through the remaining numbers, checking the opposing columns or rows to see if we can narrow any down to single cells.
The quickest way to cross hatch is to look for a row or column where you need a number, and then find one of those numbers in a box where you have one or more cells empty. This will automatically eliminate those cells as a possibility for that number. For example let’s look at column 1. We need 5 numbers, and one of them is a 9. Now look down in box 7, where we have a 9, and 3 empty cells. This means the 9 can’t go in any of those cells, so it must go in one of the 2 remaining cells in box 4. Unfortunately we don’t have a 9 in one of the 2 rows, so we don’t yet know which cell it will go in, but we can mark the 9 in as a candidate for those 2 cells.
Naked Pair
Now take a look at R9C1 and R9C7. Notice that they both have the same 2 candidates, and only 2 candidates. Is this meaningful in any way? It most certainly is. This is what’s called a Naked Pair. In this instance, we know that 1 and 6 must go in those two boxes, therefore we can remove them as candidates from any of the other cells along that row. If the Naked Pair was in the same box, we could remove them as candidates from all other cells within the box. This is a great help to us now in box 8, as 1 was a candidate in 3 of the cells, and we’ve just removed 2 of them from contention. We now know that 1 goes in R7C6.
In addition to Naked Pairs, there’s also Naked Triples, Naked Quads, and even Naked Quints. The naked triple functions exactly the same as the naked pair. In the case of the naked quads and quints though, they’re slightly different, as they don’t need to contain all of the number in every cell, but only a combination of the same 4 or 5 numbers within their 4 or 5 cells. When this scenario is taking place, the other instances of candidates of those numbers can be removed.
Pointing Pairs and Pointing Triples
The Pointing Pair can also be used to remove single numbers as candidates. In any box where a candidate is in any 2 cells in a row or column within that box, but is not a candidate in any of the other cells in that row or column, then the other candidates of that number within the box can be removed. Look at column 9 as an example. We see the 7 in rows 2 and 3 as a candidate, and nowhere else along that row, thanks to a 7 being in column 1 of box 6, and column 3 being filled with other numbers in box 9. So the 7 can be removed as a candidate from the other cells in box 3.
Pointing Triples function in the same way. When you see a number as a candidate in an entire row or column of a box, and nowhere else along that row or column, you can remove it as a candidate from the rest of the box’s cells, as you know it must go in that row or column only. You can see several examples of them in our current puzzle, though none of them help us to reduce any candidates in their boxes.
Hidden Pairs, Hidden Triples and Hidden Quads
Lastly are Hidden Pairs, Hidden Triples, and Hidden Quads. If you remember how hidden singles function, it’s the same concept. You’re looking for instances where the given cells are the only ones those numbers could go in. Check column 5 in our puzzle above for an example of a hidden pair. Only the 8 and 9 can go in rows 3 and 6. We don’t yet know which number goes in which cell, but now that we’ve identified them, we can remove them as candidates from the other cells in the row. Since we also had a naked pair in that column, the 7 and 6, we now know that 6 can only go in row 7.
Filling these numbers in sets off a chain reaction that leads to more numbers finding homes. This is the beauty of Sudoku, as one thing logically leads into the next, until the entire board is filled in. Go ahead and see if you can do just that with the rest of this board, utilising all of the techniques you’ve just learned.
How To Play Sudoku Part 5 – Advanced Sudoku Solving Strategies
Be the first to comment